Everybody loves a bubble bath, show me a person who doesn’t and I’ll show you a liar. Bubbles are fun but for pool owners bubbles represent a time for panic. For us, bubbles are no longer the sign of fun in the sun and frolicking, they are a harbinger of doom. Ok, that was a little excessive but you get the point. A stream of bubbles is a sign of the unwanted presence of air within our pool’s plumbing system. This air is likely the cause of a sucking air leak from a pump, union or diverter gasket. The leaks and the air pockets they form will lower water pressure and greatly decrease the capacity of our filter system.
Knowing bubbles are bad is one thing but knowing where they are coming from and how to stop them is another. In this blog we will walk through the common culprits of pool air leaks and provide you tips on diagnosing your own system. Let’s begin!
Fresh Air is Sometimes Bad
Bubbles streaming out of your return could be a result of low water levels in the skimmer. The optimal water level is halfway up the skimmer face plate. Most skimmers have four screw holes going up the face plate vertically; the optimal water level would be between the second and third screws. This will supply your skimmer with enough water to keep your pipes full and your pump happy.
If the pool requires refilling more often than usual then that might be a sign of a leak in the plumbing or the basin. Natural evaporation rates top out at a quarter of an inch even in the hottest of of temperatures. If you are unsure of your pool’s evaporation rate or water loss, we can use the Bucket Test to test for both. Even in hot temperatures like Florida or Texas, it is unlikely that the evaporation rate would rise above ¼”. To check your evaporation rate try the “Bucket Test.” Sounds fun, right?
The steps of the Bucket Test are as follows:
- Fill 5-gallon bucket with pool water until the water level is two to three inches from the top. Mark the fill line with a pencil.
- Mark the current water level of the pool with a piece of duct tape and Sharpie marker. Place five to seven inch piece of tape along the wall partially submerged in water. Mark the water level using the Sharpie on the tape. This prevents us from marking up the wall or liner.
- Set the bucket on the first step of your pool entry so it is partially submerged. On the second piece of tape mark the water level of the pool as it rises on the outside of the bucket.
- Wait 24 hours. Do not run pump during this test. Also keep animals away from bucket as they may drink from the bucket, skewing results.
- After 24 hours mark the current water level of both with the pencil.
- Measure the difference between the original measurements and the day after; if the measurements differ more than 1/4″ – 1/2″ you may have a leak
Pump Lid O-Rings
This little bugger can cause more trouble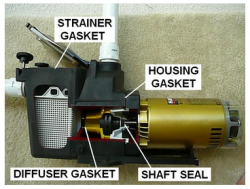 than it’s worth. Located on the strainer housing of the pump, it creates a vacuum lock seal for the pump housing to guarantee pump priming. If this o-ring is out of place it will allow air to seep in as the pump draws from the pool. A common byproduct of a bad lid-o-ring is cavitation (large pool air leak bubbles in strainer basket) or inability to prime itself.
The need to empty the pump basket of debris is the number one cause of this o-ring getting out of shape. That type of maintenance is unavoidable so the best remedy is to treat it with care and freshly lube it after every strainer cleaning. Clean the groove of the o-ring before replacing to make sure it sits securely in place. If it is not properly seated in the groove it can become pinched and/or warped when tightening the strainer lid.
 U-N-I-O-N, It’s a Union
Pump and standard plumbing unions contain an o-ring to maintain the integrity of the joint. A good hint that a union is malfunctioning – if the o-ring is visible when the nut is removed, it is likely the source of air. The union o-ring should fit snugly into the groove of the union, out of view. Remove the gasket and place it on a flat surface to determine if it has retained its circular shape. If the gasket appears oblong or pinched, replace the gasket with a fresh one. Union gaskets are more rigid than your pump’s gaskets; once they become misshapen there is little chance of reforming them to the proper shape.
Diverter Valve O-Ring
These can be tricky as a pool may have several valves feeding water to the pump. An air sucking valve is likely to prevent the pump from priming and create cavitation within the housing if it is able to prime at all. Pool technicians have become inventful attempting to source a sucking air leak from a valve. One of these cool tricks is using incense. Light a few sticks of incense and hold the stream of smoke close to the valve seams; if a sucking air leak is present, the smoke will be seen getting sucked into the valve.
For pumps having issues with priming, I would suggest using your garden hose to source the pool air leak. While your pump is circulating, run a steady stream of water over the suspect valves and its seams; if the pump is pulling air when water is applied to the leak it will block air from entering the system. When the leak is blocked by the water the pump should prime in a few seconds as long as there are no further leaks.







Leave a Reply