

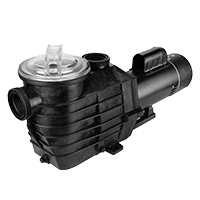
Your pool pump is the heart of your whole system; here’s how to tell when it’s struggling, and how to fix it yourself before you shell out for a service call.
If you’ve ever walked out to your pool and noticed the water looking a little off, maybe it’s cloudy, or the jets seem weaker than usual, there’s a good chance your pump is trying to tell you something. The good news is that a lot of common pump problems are surprisingly DIY-friendly. The better news is that knowing which ones aren’t can save you from turning a $30 fix into a $600 motor replacement.
Let’s walk through the most common warning signs, what’s probably causing them, and what you can realistically tackle yourself on a Saturday morning.
First, a Quick Primer on How Your Pump Works
Your pool pump pulls water in through the skimmer and main drain, pushes it through the filter, and sends it back out through the return jets. The pump has two main parts: the wet end (which moves the water) and the motor (which powers everything). Most DIY repairs involve the wet end; the motor is where things get more complicated.
Keeping this in mind will help you figure out which category your problem falls into.
Sign #1: Weak Flow from the Return Jets
What you’ll notice: The water coming back into your pool feels sluggish. The jets that used to push a solid stream are barely trickling.
What’s probably causing it: Nine times out of ten, weak flow comes down to a clog somewhere in the system, and that’s firmly in DIY territory.
What you can do yourself: Start with the most obvious culprits first. Empty the pump strainer basket (the clear or semi-transparent pot on the front of your pump). While you’re at it, pull out the skimmer basket too. You’d be surprised how much a handful of leaves can restrict your whole system.
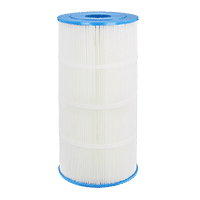
Next, check your filter pressure gauge. Every filter has a “clean” pressure; usually written down somewhere when it was first installed, or you can note it after your next cleaning. If the gauge is reading 8–10 PSI above that baseline, your filter is dirty and needs to be backwashed (for sand or DE filters) or rinsed (for cartridge filters).
If the pressure is normal but the flow is still weak, the impeller, the little spinning wheel inside your pump, may be clogged with debris like twigs or leaves. Clearing a clogged impeller requires removing the pump lid and reaching in, but it’s manageable for most homeowners.
When to call a pro: If everything is clean and you still have weak flow, there may be an issue with the pump itself, impeller damage, incorrect pump sizing, or pipe restrictions that need professional diagnosis.
Sign #2: The Pump Won’t Prime
What you’ll notice: You turn the pump on, it runs, but no water is moving. You might hear the motor humming away while the water in the pump basket sits completely still.
What’s causing it: Air is getting into the suction side of the system, preventing the pump from pulling water effectively. This could be a dried-out O-ring, a loose fitting, or a valve that’s partially closed.
What you can do yourself:
Start by turning the pump off and running it dry, even for a few minutes, which can damage the seal.
Open the pump and check the lid O-ring. This ring sits in a groove around the pump lid, and it’s the single most common cause of priming problems. If it looks flattened, cracked, or dry, replace it. A new O-ring typically costs $5–$10 and takes about two minutes to swap out. Coat the new one with a little silicone-based lubricant (not petroleum-based, it’ll eat the rubber) to help it seal properly.
Next, make sure all your suction-side valves are fully open. It sounds obvious, but a valve that got bumped to the halfway position can starve the pump of water.
To re-prime manually, fill the pump basket with water using a garden hose before restarting. This gives the pump something to grab onto and gets things moving again.
For an all-in-one pump gasket solution, pick up a pool pump gasket kit (GOKIT). Use this guide to help you find the match for your pump model: How to Find the Right Pool Pump Seal Kit
When to call a pro: If you’ve replaced the O-ring, confirmed all valves are open, and the pump still won’t prime, the impeller may be clogged, or there may be an air leak deeper in the plumbing. A professional can pressure-test the lines to find the source.
Sign #3: Air Bubbles Coming Out of the Return Jets
What you’ll notice: Instead of a smooth stream of water, your return jets are pushing out a bubbly, frothy mix. It almost looks like a hot tub.
What’s probably causing it: Air is being sucked into the system somewhere on the suction side. The pump is pulling in air along with water, and you’re seeing it come out the other end.
What you can do yourself:
This one is closely related to the priming issue above. Check and replace the pump lid O-ring first; it’s the most common culprit.
Also, check your water level. If the pool water has dropped below the halfway point of the skimmer opening, the skimmer will start gulping air along with water. Top off the pool and see if the bubbles stop.
A helpful trick: run the pump at night with a flashlight and look closely at your suction-side connections. You can sometimes see tiny streams of bubbles being pulled into a fitting, which pinpoints exactly where the air is entering.
When to call a pro: Persistent bubbles after checking all the above may indicate a crack in the suction line underground, which requires leak detection equipment.
Sign #4: The Pump Won’t Turn On

What you’ll notice: You flip the switch (or the timer kicks on), and nothing happens. Silence.
What’s probably causing it: Before you assume the motor is dead, check the basics. Most “dead pump” calls turn out to be electrical issues with simple solutions.
What you can do yourself:
Check the circuit breaker for the pump. If it’s tripped, reset it. If it trips again immediately, stop. That’s a sign of a more serious problem, and you shouldn’t keep resetting it.
Next, check the GFCI outlet or breaker. Pool pumps in Florida (and most states) are required to run on a GFCI-protected circuit. These can trip from moisture or a minor fault. Press the “Reset” button on the outlet or the GFCI breaker in your panel.
If your pump runs on a timer, check the timer settings. A timer that got bumped or lost its settings after a power outage is a surprisingly frequent offender. Most timers also have a manual override. Try running the pump manually to confirm whether it’s the timer or the pump.
When to call a pro: If the breaker keeps tripping, you see any burn marks near the wiring or motor, or the motor hums but doesn’t spin, stop troubleshooting and call an electrician or pool professional. Electrical issues around water are serious, and continuing to reset a tripping breaker can cause a fire or electrocution hazard.
Sign #5: Loud or Unusual Noises

What you’ll notice: Something has changed about the sound your pump makes. Instead of the usual steady hum, you’re hearing grinding, screeching, rattling, or a high-pitched whine.
What’s causing it: The specific sound tells you a lot.
- Rattling or clanking – often debris in the pump basket or impeller. Check both before assuming the worst.
- High-pitched whining or screaming – usually cavitation, which means the pump is trying to pull in more water than it can get. Check for blockages, low water level, or a partially closed valve.
- Grinding or screeching – this is the one you don’t want to hear, because it typically points to worn or failing motor bearings inside the motor.
What you can do yourself:
Clear any debris from the basket first. If the noise stops, great. If you’re hearing cavitation, work through the same checklist as weak flow: clean filter, open valves, and full water level.
When to call a pro: Grinding or screeching from the motor end almost always means bearing failure. You can replace pump bearings yourself if you’re mechanically inclined and comfortable with motor disassembly. Still, most homeowners are better off taking the motor to a motor repair shop or having a pool tech handle it. Running a pump with bad bearings will quickly destroy the motor, turning a $100–$150 repair into a $400–$600 motor replacement.
Sign #6: Visible Leaks Around the Pump
What you’ll notice: There’s water pooling on the ground under or around the pump when it’s running or sometimes even when it’s off.
What’s probably causing it: The location of the leak tells you what you’re dealing with.
What you can do yourself:
A leak from the pump lid area is almost always the lid O-ring. Inexpensive, easy fix, see Sign #2 above.
A leak from the union fittings (the threaded connections where the pipes meet the pump) is usually a worn union O-ring. You can replace these yourself: close the valves, unscrew the union, swap the O-ring, and reassemble. Cost is typically under $10.
A leak dripping from the motor end of the pump (behind the impeller) indicates a failing shaft seal. The shaft seal is the mechanical seal that keeps water in the wet end from getting into the motor. Replacing it requires removing the motor from the pump housing and pulling the impeller, but it’s a repair many experienced DIYers tackle successfully. The parts run $20–$40.
When to call a pro: A crack in the pump housing itself usually means the pump needs to be replaced. Also, call a pro if you find water near the motor’s electrical connections.
Sign #7: The Motor Overheats and Shuts Off

What you’ll notice: The pump runs for a while, then shuts off on its own. After it cools down, it starts again, and the cycle repeats.
What’s probably causing it: The motor has a built-in thermal overload protector that cuts power when it gets too hot. This is a safety feature, but it’s telling you something is wrong.
What you can do yourself:
First, make sure the pump has adequate airflow around it. If it’s installed in a tight pump house or cabinet, heat can build up quickly. Improving ventilation can sometimes solve the problem on its own.
Next, check for anything that would make the motor work harder than normal: a very dirty filter (high resistance), closed or partially closed valves, or extremely long pipe runs. Reducing the load on the motor helps it run cooler.
When to call a pro: If the pump is well-ventilated and the system isn’t restricted, but the overheating continues, the motor itself may have damaged windings or a bad run or start capacitor. Repeated overheating causes cumulative damage, so don’t ignore this one; have it inspected sooner rather than later.
Sign #8: The Pool Stays Cloudy Even Though the Pump Is Running

What you’ll notice: The pump is running on schedule, the filter looks fine, but the water just won’t clear up.
What’s causing it: A few different things could be at play, and most of them are DIY territory.
What you can do yourself:
Check how many hours per day your pump is running. In Florida’s heat and sunlight, many pools need 8–12 hours per day in summer, and the full volume of the pool should turn over at least once daily. If your pump is set to run 4–5 hours, simply increasing run time can make a significant difference. A healthy dose of pool clarifier or flocculant can also tame most pool water cloudiness.
Make sure your water chemistry is balanced. A pump that’s running perfectly can’t fix water that’s out of balance. Low sanitizer levels allow algae and bacteria to thrive regardless of circulation.
If the runtime and chemistry check out, inspect your filter media. DE filter grids older than 3–5 years and sand that hasn’t been changed in 5+ years lose filtration efficiency. Old media lets fine particles pass through instead of trapping them. Best Methods to Prevent Pool Circulation Dead Spots
When to call a pro: Persistent cloudiness despite good circulation, balanced chemistry, and clean/fresh filter media may indicate a flow bypass issue inside the filter tank that requires professional inspection.
A Simple Maintenance Routine to Prevent Most Problems
Most pump problems are preventable with a little regular attention:
- Every week: Clean the pump strainer basket and the skimmer basket. Check the filter pressure gauge. If you notice a change in how anything sounds or looks, don’t ignore it.
- Every month: Inspect the pump lid O-ring and lubricate it with silicone grease if it looks dry. Listen to the pump while it runs and compare it to what “normal” sounds like for your setup.
- Every season: Backwash or clean the filter thoroughly. Inspect all unions and fittings for signs of wear. Check the wiring and conduit for UV damage Florida sun is brutal on exposed cables.
The Bottom Line
The honest rule of thumb for pool pump repair is this: if it involves water and O-rings, you can probably handle it yourself. If it involves electricity beyond resetting a breaker, or if the problem is inside the motor itself, it’s worth calling a professional. A good pool tech isn’t cheap, but neither is a burned-out motor from a pump that kept running with bad bearings.
Pay attention to your pump. It works hard every single day, and the little warning signs it gives you, such as an unusual sound, a drop in pressure, a puddle under the equipment pad, are worth acting on early. A $10 O-ring today beats a $600 pump replacement next summer every time.
Always turn off the power to your pump at the breaker before doing any hands-on work. If you’re ever unsure about an electrical component, stop and call a licensed professional.


Leave a Reply